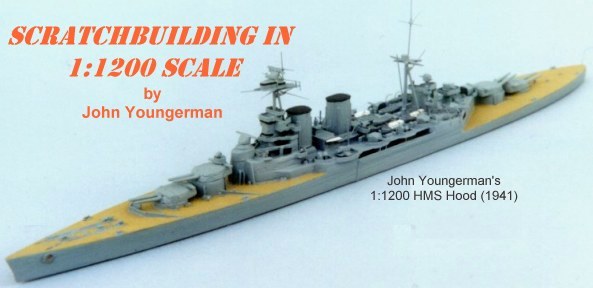
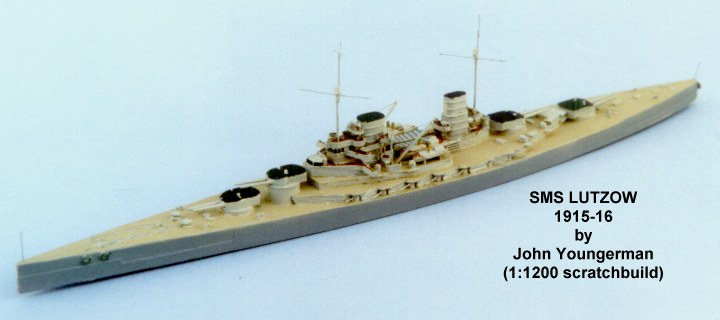
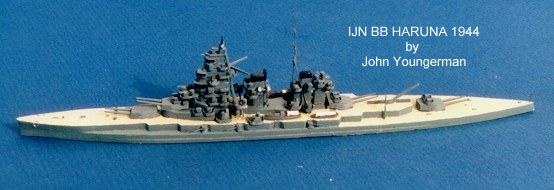
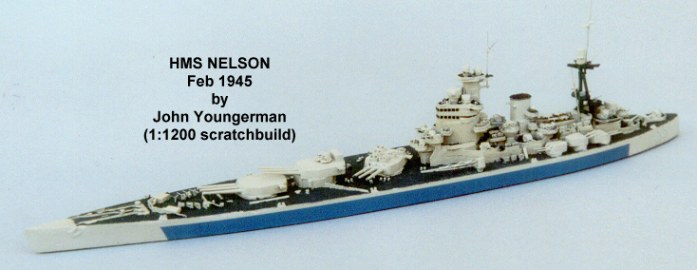
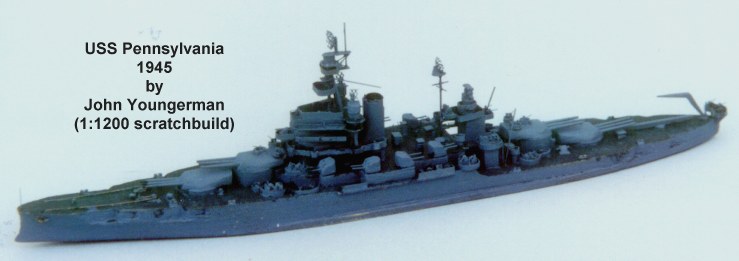
|
MATERIALS
Obviously, one can use a large variety of materials in scratch building model ships at
1:1200 scale. Friends have earnestly recommended sheet or block plastic, lime wood, sugar
pine, resin-filled plastic, and maybe other materials that I have forgotten over the
years. Most would tell me that I just plain couldn’t build respectable models using
balsa wood as my basic material. Well, based on 37 years of experience, I disagree. I use
balsa exclusively and am able to achieve credible results with elementary tools and really
a minimum of time. Balsa does, however, have a more noticeable grain than other materials
and I will deal with my techniques to minimize the "grain" problem later in this
article. The main advantage with balsa is that it is readily available in standard
thicknesses of 1/32", 1/16", 3/32", 1/8", 3/16", and ¼".
You can occasionally find thicker sheets, but they have extremely limited use in this
scale.
For decks and pretty much all horizontal surfaces including roofs, I use artists’
Bristol Board or good quality business card stock. Bristol Board is usually available in
one, two, and three-ply thicknesses. Try an artists’ supply house to obtain it. It
has a hard, slick finish and is great to draw on. It cuts easily with a #11 Xacto blade or
a single edge razor blade. Business cards can also be used and have the advantage that
they are relatively thin and are stiffer for their thickness than Bristol Board (BB). I
normally use two-ply BB for decks or for roofs of deckhouses. An amazing characteristic of
BB or good business cards is that the edges can be sanded! After cutting to shape, I sand
the edges smooth to final shape and remove any "lip" by a few swipes of the
sandpaper along the flat side of the edge. I use three-ply BB in certain situations where
I want strength, but it is really a bit thick for overhanging decks, etc.
I have used plain paper, single-ply BB, or USGS quadrangle map paper for
"screens" or occasionally for the sides of deckhouses/bridges, etc. I
haven’t used plain paper in decades and wish I had never done so. Either of the other
two gives really good results. Single-ply BB is a bit thicker and stiffer than quad paper,
but either is satisfactory. I cut long strips to the height of the screens, usually about
0.045", and glue them to the edges of the two-ply BB deck using white glue.
I have used white glue almost exclusively for decades, but recently have started using
thick CA-glue where I want to mate plastic to wood or BB. It works great. White glue will
also work, but takes longer to dry and the joint is not as sturdy, especially if my
fingers get clumsy! I always use white glue for BB to wood, BB to BB or BB to paper, or
for masts. It is really quite strong and dries relatively fast, but slowly enough to work
things into precise positions before they dry.
Masts can be made of several materials. I normally use brass wire obtained from my
local train shop. Detail Associates is the brand I use. I have used all diameters
available up through 0.019". Evergreen makes plastic strips, sheet, rods and tubes
and other shapes and I find myself using them more and more to save time sanding wood to
teeny weeny sizes. Techstar also makes plastic rods and tubes in various small diameters
similar to Evergreen. I find that they produce more perfectly circular rod, but have fewer
diameters to work with. Plastic rod can also be used for masts that are really thick, such
as 3 feet thick on the actual ship. I have also sanded down toothpicks to the proper
diameter. Again, toothpicks would only be used for thicker masts. They are really strong
and will not bend. It’s just a pain to sand them down. The smallest diameter plastic
rod available is 0.010", made only by Grandt Line for railroad enthusiasts. I use it
in cetain situations where I don’t want brass. I don’t recommend using it for
tripod masts, as it has no strength, but have used it for the crosspieces in lattice
masts, gluing it to brass usually. Another material that can be used for masts, but is
really difficult to cut, is orthodontist’s wire used for braces. It’s also quite
thick for all but the larger masts. But it is really rigid if that’s what is needed.
Get from a dental supply house.
Despite the most careful sanding and assembly, one will occasionally find pieces or
hulls that show grain or have been carelessly dented or show other marks. I use 3M Acryl
Blue Glazing Putty, which comes in a two-pound tube, which will last forever. It is far
superior to the usual stuff that plastic modelers use and can be sanded pretty much like
balsa. Spread it on lightly just to fill the dents or marks, dry for a half-hour, and sand
carefully (I’ll describe sanding tools later). If you are clever, you can thin it
with lacquer thinner and spread it easier or use it to make shapes that are really
difficult to achieve in solid materials. Vent cowls come to mind here.
Miscellaneous materials include etched brass mesh available from your local train shop
in several mesh sizes and usable for radar antennas as well as aluminum micro mesh, made
by Scale Scenics, also from your train shop, usable for radar antennas. The aluminum mesh
has the advantage that it can be "molded" to many shapes, such as hemispherical
radar antennas. Also, lintless sewing thread is really good to represent anchor chain.
I’ve never found any chain small enough to use in this scale. Decals in various
colors in the form of stripes are very useful and readily available from most hobby shops.
Black decal strips cut to proper width and length are used for bridge windows. Be advised
that they are a real pain to use when they are so small.
TOOLS
Perhaps as important as materials are the "tools" you use. I put the word in
quotes because few of the tools one uses are standard ones. They are mostly adaptations to
the needs of this scale and the materials used.
I buy #11 Xacto blades and industrial quality single edge razor blades in boxes of 100
when I can find them, usually through a company called Micro Mark, but they may be
available elsewhere. I go through a lot of blades in a year! For sanding, I have a few
hardwood sanding sticks which originally came with Strombecker wood airplane kits about
40-50 years ago when I was a kid. I glue the sandpaper to the stick with white glue and
peel it off and replace it when it’s used up too much to sand anymore. I rather think
Strombecker did some research on the appropriate size of these sticks, as they seem to fit
the hand perfectly. They measure 4-1/2" X just over ¾" X just under ¼". I
use them to sand hulls and deckhouses and anything made of balsa or plastic to shape.
Concave surfaces such as bow flares are done with various sizes of wood dowels wrapped
with 6/0 sandpaper, then with 320 or 400 grit wet or dry sandpaper. Dowels are readily
available in such places as Home Depot (which of course is every real guy’s favorite
store). I can’t emphasize the importance of sanding sticks/dowels too much. Used
delicately and artistically, they can do wonders for the builder in this scale. And the
wet or dry paper can readily be used to sand plastic to shape also. From sanding sticks,
we pass to tweezers, which are essential. I have found that the long pointed tweezers are
the best. Normal tweezers like your wife uses for those stray hairs that keep popping up
are O.K., but much less precise. Get the best long pointed tweezers you can.
How do I measure? Techniques will come later, but I have a flat scale made in Australia
by "W&G", model no. wg/s 2312, scaled in hundredths and eightieths of an
inch. This scale has been a lifesaver and I do not know if it can still be purchased, here
or in Australia. Obviously, it is perfect for 1" = 100" scale. The smallest
marks are at 0.02", so one can reasonably estimate down to 0.01" or one foot. I
recently purchased a flat steel scale made by the L. S. Starrett Co., model no. 0305R,
which has tenths and hundredths of an inch on one side. The smallest marks are at
0.01". However, the design is such that it is more difficult to read and use. But
here’s the good news. You can use any scale you want if you just divide the model
length in inches (i.e., 688’ = 6.88" in 1200 scale) by the plan length taken
using that same scale. For instance, if you are using a "60" on an engineering
scale, use that scale to measure the length of the ship from your plans and use that
engineering scale to measure lengths for your 1:1200 scale model. You can also make it
work for 1" = 104’ (1:1250). I just write the proportion or conversion factor on
the plans, usually to three places after the decimal point, and then multiply plan
dimensions by that decimal value using a cheap calculator. The closer you can measure, the
more accurate the model and the fewer "adjustments" you will have to make to
make everything fit where tolerances are miniscule (which happens more often than you
would think).
At this point, I thought I would mention that I cut brass for the masts and guns with
an Xacto knife on a 0.040" thick piece of plastic for rigidity. Glass is even better,
but you will dull your knife after one cut. Use the heel of the blade if possible to save
the point. This gives a perfectly square end to the brass. I cut plastic rod/tube with a
razor blade or razor saw, scoring first as needed. For reaming out plastic tubing and some
other uses, I use needle point files. For drilling, I use the extremely small drill bits
available from Micro Mark or other suppliers in a pin vise. When gluing plastic parts
together, I recommend using MEK (methyl ethyl ketone), a liquid cement, also available
from paint stores or Home Depot, applied with a draftsman’s ruling pen or an old
paint brush. An alternate would be CA-glue, but the joint will not be as strong.
REFERENCE MATERIALS
Obviously, one needs accurate plans to a reasonable size as a basis for making an accurate
model. There are numerous sources of such plans including books, magazines, periodicals,
plan producers, etc. Get as many as you can and compare them with each other and with
available photos to determine which plan set is most accurate. Because plans and photos
may tend to be scattered in many different places and, especially if they are in
periodicals, can be hard to locate, I started, many years ago, a card file index of
references to particular ships or classes of ships. I have a metal 3X5 card file full of
cards listing where to find plans, profiles, photos, and articles about various ships.
It’s great if you have a specialty book that provides all the information you will
ever want—and more –about a particular ship, but sometimes one finds material
scattered in many places. I also have a two-drawer file cabinet with manila file folders
for loose materials such as plans or photos. My tabs are by country and ship type, such as
USA-battleships and battlecruisers. I find this very helpful, especially as I download and
print tons of material off the various websites—WARSHIP in particular has provided me
with invaluable material for modeling in 1:1200 scale. The drawer file gives me a place to
keep this material organized and filed and readily reachable.
HULL CONSTRUCTION
Hulls are invariably constructed of plank balsa, most often of thinner planks glued
together with white glue and placed under a heavy weight to dry without warping. The decks
are usually covered with business card stock, but sometimes are left alone. Insert shaped
"wedges" of balsa at the bow—and occasionally at the stern—to build in
the longitudinal sheer of the deck. To do this, use a razor blade or razor saw to cut a
slit in the bow (or stern) deep enough to accommodate the balsa wedge. Fill any holes with
putty after you have sanded to shape. Shaping the hull is a matter of cutting to rough
shape with a razor blade and then using one’s "Mark I eyeball" and artistic
sense to finish sanding to correct shape. I would recommend the Mark I against trying to
make an accurate two-sided drawing of a hull on BB or card stock. Sometimes it is
necessary, though, especially for World War One era battleships. Use the dowels wrapped
with 6/0 sandpaper to produce the bow flare. If in doubt as to the diameter of dowel to
use, use one size larger than you think it should be. You can always finish with a smaller
diameter. With balsa, this job doesn’t take forever as it would with plastic or
hardwood. At this point, with the hull sanded to shape, cut out any armor plate from two
or three ply BB and glue to the hull sides. Likewise, add any bulges at this point. Bulges
are made from balsa sheet, cut to correct outline shape and sanded to round them to very
close to exact shape. After the glue is dry, you can finish sanding the bulges. Bulges are
usually very fragile and tricky and can generate some interesting swear words. At this
point, I usually add the deck from card stock or BB and trim and sand to shape. I then
paint the hull with several coats of Testors Dullcote or Glosscote lacquer and lightly
sand. To find any graininess or open pores in the wood, prime with a gray enamel. Then use
the putty to seal the pores and lightly sand to smooth the hull. This is an iterative
process and one has to redo as needed until satisfied.
However, at this point, I want to make an important point. I make these models so that
they will look good and well finished to the naked eye. If one were to use a
magnifying glass, they would really look crude, including slight imperfections in the hull
and deckhouses or turrets that are not noticed by the naked eye. Final painting takes care
of much of this, but I have accepted the philosophy that I would rather make ten slightly
imperfect models than make one totally perfect one. I suspect that all models, to any
scale, are in differing degrees imperfect representations of the original and the demands
of this small scale are such that small imperfections have to be overlooked.
DECKHOUSES,
BRIDGES and FUNNELS
After getting the hull in good shape, start with the main deck structures. Draw them to
correct shape on either two ply BB or card stock. It seems that most navies construct
decks with a height of about 8-1/2 feet. This is very closely represented by 1/16"
sheet with two ply BB glued on for the roof or the deck on top. For instance, a bridge
structure may start with the lowest deck in a roughly rectangular shape with the front
corners cut off or rounded. Draw the correct shape on BB, cut it out, and glue to
1/16" sheet. The BB forms the roof of this deck (not the floor—do it enough
times and you will see why). The next deck, which usually has wings or otherwise sticks
out, is drawn on BB and cut and sanded to final shape. Add the deckhouse cut and sanded
from 1/16" balsa sheet. Then cut the screens out of one ply BB or quad paper and glue
them to the edges of the deck as appropriate. Here, I want to comment about scale. The
average "screen" on warships was/is usually less than six inches thick, which in
this scale means less than 0.005". The screens on commercially produced models are
almost always at least 0.01" – 0.02" thick or thicker for
production/molding reasons. I feel that this gives an "overscale" look to that
part of the model. If you think about it, unless a feature is at least 0.01" and
maybe 0.02" in its smallest dimension, it is not practical to try to reproduce it as
one couldn’t see it anyway. Everything in this small scale is
"representational" anyway, and one has to compromise constantly. Another reason
to use thinner stock for screens is that it is easier to bend to follow the deck edge
outline.
Bridges and other multi-level structures are built up layer after layer using this
technique. Where the bridge is a massive block, as on certain battleships, I make the
block out of balsa, adding bridge wings, etc., by gluing them on to the block. Vanguard,
Bismarck, Scharnhorst, and Warspite are examples of ships with massive block
superstructures.
Gun tubs are usually made from circular bases cut from two-ply BB with screens glued
on. In cases where it is not practical to use a base, I would use card stock for the
screens, rolling them to circular shape with a paint brush handle pressed against my
finger and gluing the screens directly to the hull/deck. An alternative that I
occasionally use is cutting sections from a plastic straw—if you can find one with
the correct diameter—or cutting sections from plastic tubing after reaming it to
reduce the apparent thickness for scale purposes. I use a #11 Xacto blade to ream ends of
plastic tubing. You have to be careful cutting it when you have done this as its strength
has been reduced.
MASTS and TRIPODS
Masts are usually constructed of brass wire (see Materials). Glue various sizes together
as needed using white glue. The joints will be surprisingly strong. Spars are also brass
wire, glued on with white glue. Starfish are cut to shape either from two-ply BB or
plastic sheet, with the triangular "arms" glued on underneath. Leave a hole or
holes at the point(s) where the mast(s) goes through. Poke or drill a hole in the deck for
the mast and glue with either or both CA glue and white glue. CA glue has the advantage
that it sets up fast and gives one some strength immediately. However, white glue also
works fine as you may have to adjust the mast so it looks right. The masts on most if not
all commercially produced models are made over thick due to production/molding problems.
Using brass wire will force one to estimate the thickness of the mast and spars and will
aid in producing more of a "scale" look. If a mast is really thick with a severe
taper, fabricate it from a sanded down toothpick. The masts on the Des Moines class CAs
are an example that comes to mind. Plastic rod is an alternative for very thick masts or
for the tripods that were part of many bridge structures and which supported director
structures. However, 0.020" – 0.025" plastic rod has little strength
against bending and has to be used carefully. Once it is glued into the tripod shape, it
is quite strong.
Lattice masts are "representational" unless one is a whiz at photoetching
(PE). Maybe someday…. Also, one should keep in mind that lattice structures are quite
light but strong; thus, the individual pieces are best constructed from small size wire
such as 0.008" or 0.010" at most. If you think about it, most warships had a
weight problem and building masts out of three or four-foot thick tubes would mean placing
a huge weight very high up. Generally, they didn’t do it! Masts had to be big enough
to support lookouts or director houses or radar and radio wires. Keep them trim looking in
this scale.
RADAR
For many years, radar antenna were constructed from card stock or two ply BB or,
sometimes, thin plastic sheet. However, with the advent of brass PE screening or aluminum
mesh micro-screening, I now use that, if appropriate, for radar screens. To form a
hemispherical surface, cut to circular shape, place it on your finger, and form around the
end of a paint brush. Glue on with either white glue or CA glue. Form other shapes using
paint brush handles rolled against your finger. The modern "solid" radar antenna
can be made from card stock, etc. Card stock or thin plastic sheet can also be formed into
a somewhat hemispherical surface with a paint brush handle and your finger. You can add
emitters from plastic stock or plastic rod if you wish to go to that level of detail.
FUNNELS
Funnels are always constructed from balsa cut to size and rounded. If simple, funnel caps
can be constructed from BB, card stock, and/or plastic sheet. If doing that would be too
difficult, I just delicately trim a "ledge" at the height of the cap base and
sand the cap to proper shape. I can’t say much except it’s an art! Steampipes
are added from 0.01" plastic rod or brass wire. Platforms on a funnel may be simply
glued on, but sometimes mean that the funnel has to be cut and the platform glued down and
the rest of the funnel added. Searchlights are made from plastic rod in an appropriate
diameter, with a base made from BB with a notch cut in it. It’s very simplistic, but
these details are so small that anything more elaborate is wasted.
TURRETS, GUNHOUSES,
etc.
Turrets are made from balsa sanded to the correct thickness and cut to proper width. I
just sand the front or rear (whichever is the more difficult) to shape, cut to length, and
sand the other end to shape. What’s difficult is making all the turrets alike. For
battleships/battlecruisers, the guns are made from toothpicks, sanded to a tapered shape
and size using a sanding stick. A powered tool would also work well here, but you would
have to be very careful not to snap the barrel or sand too much. Because the results would
not be visible in this scale, I do not "step" the barrels. I have tried it and
find that it is practically impossible to sand a 3" to 6" step into a barrel,
i.e., 0.0025" – 0.005". Leave well enough alone. For smaller gun sizes, I
use brass wire. 0.012" is pretty good for 8" guns, 0.010" for 6" guns
and 5" guns, 0.008" for 3" or 5" guns, and 0.006" for 40mm guns.
Smaller 20mm or Japanese 25mm guns are made from very fine stainless steel wire
"liberated" from the space industry and generally unavailable, though worth
trying to obtain. One needs to think about the actual diameter of these guns on the
original and try not to make them too thick, as they will look "clunky".
Barbettes are made from BB or from BB glued to balsa and sanded to shape. If you are
lucky, you can use plastic tube stock. However, my experience is that it is never just the
right size. I use a circle template to draw the barbette circles on BB and cut out with a
#11, sanding to perfect circles. Gunhouses are pretty much similar in construction, but
may have additions of BB or plastic sheet. Gunhouses are solid, with the open rear painted
dull black.
DECK DETAILS
Warships usually have various rectangular or circular hatches, vents, cowls, reels,
winches, and windlasses scattered all over them. Adding them from plastic sheet or rod
gives a more realistic look to the model, but trying to reproduce every little excrescence
on the decks is tedious and to my mind makes the ship look cluttered. I also add bitts for
docking lines from 0.020" plastic rod glued to 0.010 X 0.020 plastic strip and sanded
to size. Inevitably, they are a bit oversize except for battleships, but they look nice if
used sparingly. Cradles for ships boats are made from BB. Cut a strip of BB the width of
the largest cradle, cut a very shallow "V" in the end, slice it off, repeat as
needed. Then cut the strip to the next largest width and repeat. Glue on with white glue
or CA glue. White glue is better because, by this time, things are getting a bit cluttered
and cramped on deck and you will need time to adjust the cradle to its exact position. My
general philosophy on deck details is to stop when it looks nice and not try to overdo it.
PAINTING
I usually put about two or three coats of clearcote or dullcote on after I have finished
with construction. This fills in any minor endgrain on the deckhouses and generally
smooths things out. You can certainly spray it, which I do sometimes. I spray the hull
bottom also and sand it smooth (somewhat). This is the point where you have to prime the
model or otherwise check it for flaws. I almost always spray the main color on and
handpaint the rest, such as wood decks and bridge decks, as well as any camouflage. If a
dazzle design, it is a good idea to mask the various colors, at least on the hull. I
recommend 3M’s blue masking tape designed for windows. Spray the bottom of the hull
also as it looks better. I only spray enamels as I am not comfortable with acrylics in my
airbrush. I also have never gotten as good results spraying acrylics. Make your own
choice. As a tip, I always thin enamels such as Floquil or Model master with lacquer
thinner. Do not return the thinned paint to the bottle, but dispose of it or store it for
later use. Enamel thinned with lacquer thinner works incredibly well for spraying, but
will cause problems if poured back into the bottle. Don’t try to hand paint with such
thinned paint; you will make a mess! Searchlights are represented with silver paint.
Covers for ships’ boats are usually white. Funnel caps are black with a dull black
"interior". Anchors and anchor chain are usually painted a steel or
"pewter" color for contrast and because I think it somewhat represents the color
of metal. Unpainted steel decks are steel or gunmetal, never silver. I usually go back
over the model several times with a fine brush until I am satisfied with the result and
have fixed any "slip ups", which I find happen about 100% of the time. In the
areas where there are windows, paint with glosscote and let dry. Add your windows from
black decal, cut to the excruciatingly tiny size needed. Finally, spray the model with
dullcote to achieve an even finish in terms of reflectance. Colors are really too
complicated to get into. In any case, there are several sources of color information in
books and websites. Use them. I've experimented with a number of Model Master tan colors
in an attempt to simulate wood decks. One of the best colors for wood decks was the old
Pactra Deck Tan color in the tiny bottle, no longer available. I now use, after long
experimentation, Polly Scale’s Aged Concrete, hand painted on, of course. In this
area, it’s what turns you on—or off—in terms of color.
SUMMARY
In making models to this scale, ingenuity and experimentation are the key to success,
along with a refusal to go bonkers on detail. I think you will, as I seem to, know when
enough is enough. Keep in mind that it’s all representational, just like art, and
what looks good to you probably IS good! And what you can’t see with your eyes from
about 8-12" is not worth spending time on in terms of striving for perfection. Good
luck!
|